Today's card is another one featuring Purple Onion Designs stamps by Stacey Yacula.
I stamped Cinnamon (Autumn squirrel) onto Copics X-Press It card stock, colored with Copic Markers and then fussy cut out. I then stamped a portion of the Perch image directly onto the card base and colored with Copics. I used a couple of MFT dies to cut the card front panel from soft stone card stock. The sentiment was stamped directly on the panel and then the squirrel image was attached with foam tape. The panel was attached to the card base with foam tape. The squirrel was also attached with foam tape.
The brief glimpse of fall we experienced earlier in the month is long over and we are back to hot weather again. I am still enjoying creating fall themed cards though and I have another one featuring Purple Onion Designsstamps.
I stamped Happy Pumpkins onto Copics X-Press It card stock although my version is not that happy looking because I masked off the jack o lantern smiles before stamping. After coloring with Copic markers I fussy cut the image out. I prepared the background panel by cutting taffy card stock with two different stitched dies. I stamped the sentiment from the Homegrown Sentiments in black ink onto a pool party card stock circle. I placed the sentiment piece in the opening and then attached the pumpkins with foam tape.
Products: Purple Onion Designs stamps, Simon Says, PTI and SU cs, MFT dies and ink, Copic Markers Copics: YR20, YR12, YR14, W00, E81, N1, N3
For my second project for the challenge I went with a Christmas theme. As a personal challenge to myself I used one stamp for three different cards. I chose the stag from the new Christmas Cookies set to showcase, stamping it up three times using vermillion, pinefeather and baked brown sugar ink and then cut them out with the matching Yes Dear die.
For the first card I cut a patterned paper background and then used the Grapevine Wreath CutUps to cut from the panel as well as from dark charcoal gray cardstock for an inlaid die look, attaching the stag in the center of the wreath using foam tape. Some baker's twine tied at the top finished it up.
For the second card, I cut out a kraft panel for the background then stamped the branches from the Wreath Building Kit onto the circle frame cut with a die from the Framed Up 2 set. After backing the frame with patterned paper I added liquid pearls in between the branches and attached to the background panel with foam tape. The stag was placed in the center of the circle with foam tape also and I added a red jewel for his nose. I added a banner cut with a die from the Ribbon Banners CutUps and stamped another sentiment from the Bunny Snowglobe set.
The last card features a simple patterned paper strip placed onto a woodgrain panel, I backed the stag with messy gold thread attaching with foam tape. A few red jewels finished up a clean and simple card.
Products: The Cat's Pajamas stamps and dies, Webster's Pages, My Mind's Eye and MFT dp, PTI and MFT cs, The Twinery twine, Ranger liquid pearls. Queen & Co jewels, Ranger, SU and PTI inks
Here are the details for the Challenge
• Each month a new challenge will be posted on The Cat’s Pajamas blog and our Facebook page.
• If you want to play along you just upload your design to The Cat’s Pajamas blog page using the InLinkz button provided.
• You are not required to use a Cat’s Pajamas stamp or die but if you have them we would love to see them.
• On the day of the next challenge the winner will be chosen from the previous challenge and will receive a Cat Cash Voucher for $50.
There is definitely a touch of fall in the air here in Bama. September can be one of our really hot months so it's been a blessing to have some cooler days and nights associated with autumn. And since I am in a fall state of mind, today's card features a fall image illustrated for Purple Onion Designs by Stacey Yacula.
I created the background first using a combo of Peacock Feather Distress Oxide and Gathered Twigs Distress ink sponged onto Canson Arches water color card stock and then brushed with water. After cutting the background panel with a wonky stitched rectangle, I stamped the sentiment from the Sweet Occasions Sentiment set using wet cement ink. I stamped Ginger (raccoon with pumpkin) onto Copics X Press It cardstock, colored with Copic markers and then fussy cut out. I used some linen thread to tie a bow onto the pumpkin stem and attached the image to the background using foam tape.
It is release day for The Cat's Pajamas! Three new stamp sets, four new die sets and two new Cutables are now available in The Cat's Pajamas shop. We are celebrating the release with a blog hop. If you arrived here from our newest kitty Michele's blog you are right on track. If not start at the beginning at Julie's blog.
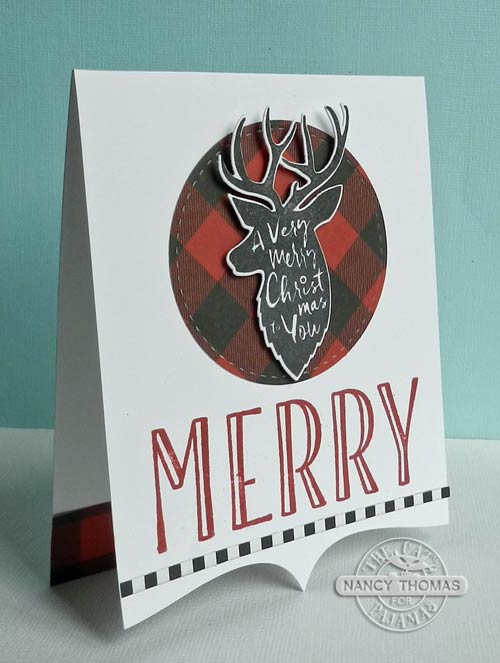
I couldn't resist using another image from the Christmas Cookies set. This time around though I wanted a more masculine look. We have several "bachelors" on our Christmas card list and I always seem to struggle finding one for them when I sit down to address and mail. The image was stamped in black and them cut out with the matching Yes Dear die. For the card base I used the Big Scallop CutUps to cut the bottom of the card front, added a tiny strip of patterned paper and stamped the sentiment from the Big Holiday Words set using schoolhouse red ink. I attached the deer with foam tape to a circle cut from another patterned paper and then added a small strip of the same paper on the inside of the card.
Products: The Cat's Pajamas stamps and dies, Carta Bella and PTI dp, PTI cs, Simon Says ink
And for my second project I used another of the new Cutables, the Ginger Bread House Treat Box to create a fun Christmas goody package.
I cut the box out from kraft card stock and sponged all the edges with white ink. The box was easy to assemble and then the real fun began with decorating it with the various pieces. I glittered all the "candy" pieces and the ends of the icicles and then attached all the pieces. There are a variety of ways to decorate this so there is really no wrong way. The "chimneys" at the top act as the closure. Here are a few more views:
Products: The Cat's Pajamas Cutables, SU and Bazzill cs, Doodlebug Sugar Coating glitter and enamel dot, SU ink
Here is a video explaining how to put together the box:
That's it from me. Check out all the details regarding this release at The Cat's Pajamas blog. Your next stop on the hop is the very talented Wendy.
Welcome to the The Cat's Pajamas Sneaky Peek Week! We have three new stamp sets, four new dies and two new Cutables all of which will be released on September 12 in the TCP store. I am kicking off the first of seven days of Sneaky Peek week. Each member of the design team will be taking turns sharing creations so be sure to stop by The Cat's Pajamas blog everyday to see who is on the schedule. I promise you won't be disappointed. Warning, this is a picture heavy post as I have several projects to share with you!
Today is also the first day of new TCP Tuesday #339 Challenge. We are rolling out this challenge a bit different as we are working around sneak peek week also. Each day a designer will highlight a challenge project on their design day. And it's an easy one to create, a Fall or Winter Holiday project. So many possibilities, Halloween, Thanksgiving, Christmas, Chanukah, New Year's, Valentine's Day or any other fall or winter holiday you celebrate in your country. Even though the design team projects will occur across the week, you can upload your project any time. The Cat's Pajamas blog will have the details and the link up on how you can win a chance for a $50 gift voucher.
I selected Halloween as my holiday because of this really fun new Creep it Real set. The big eared bunny on a broomstick cracks me up. I tend to like cute Halloween rather than scary and this image fits the bill. I colored up the bun with Copic markers and then fussy cut the image out. I wanted a simple background so I blended Peacock Feathers and Faded Jeans distress oxide inks onto watercolor card stock cut with a stitched die, then spritzed with water. After it dried I attached the image with foam tape and stamped the sentiment onto the background then mounted the panel on a wild wisteria card base. A few sequins finished it up.
Fast forward from Halloween and TCP Tuesday to Christmas with this card using the new Christmas Cookies set. I stamped up the bell image twice using Delicata Silver Shimmer ink, then cut both of them out using the matching die from the new Tree/Bell die set. I stamped the big sentiment using the new Big Holiday Words set in pure poppy ink onto a linen card stock piece cut with a stitched die. The two bells were attached underneath the sentiment using foam tape and I added a small gingham bow at the top. After attaching the panel to a patterned paper mat, a scattering of rain stones added a bit more sparkle.
Products: The Cat's Pajamas stamps and dies, PTI dp and cs, May Arts Ribbon, PTI rainstones, PTI and Delicata ink
For this card I used another image from the Christmas Cookies set. I stamped the tree once with green parakeet and then inked the edges of the stamp with new leaf ink and stamped again. I cut it out with with the matching die from the new Tree/Bell die set. To prepare the background I blended Peacock Feathers distress oxide inks onto watercolor card stock cut with a stitched die, then spritzed with water. After the panel dried, I stamped an image from the Wreath Building Kit using Versamark ink and white embossed it to help ground the tree image which I attached with foam tape. A few wood veneer stars added to a simple and easy Christmas card.
Products: The Cat's Pajamas stamps and dies, Ranger and PTI cs, Studio Calico Veneer stars, PTI and Ranger Distress Oxide ink
And last but certainly not least I used the new Cracker and Box Cutable to create this cute gift box. The cutable contains two types of containers. I used my Silhouette Cameo 3 to cut the box from two sided card stock quality patterned paper, then followed the easy directions to assemble. There were mats included in the cut files but I decided not to use them and tied the box together with ribbon. To decorate the box I used the Snowflakes CutUps to cut a retro style snowflake from textured white card stock and a pink heart cut with a die from the Small Envie CutUps. I layered the two die cuts together, added a small button tied with hemp cord, then attached the piece to the front of the box with foam tape. The whole process could not have been easier!
Here is a video explaining how to put together both of the box types:
Products: The Cat's Pajamas Cutables and Dies, Bazzill and PTI cs, Michaels ribbon, Hemptique cord
For a chance to win a $10 gift certificate to the store, comment on each of the designer's blogs on a daily basis including mine today and also on my Instagram account @nancyhthomas. Winners will be announced on The Cat's Pajamas Blog and Facebook page each day. The sweet and creativeWendywill be your stop tomorrow but you can always check out the TCP blog to see who is scheduled each day.
In accordance with the FTC 16 CFR Part 255, The Cat's Pajamas and Purple Onion Designs have generously supplied me with complimentary and/or discounted products for promotional purposes.
Blog Design By
Using elements from Certainly Fresh by Cori Gammon.